
Nordic Skating 101: Getting out Safely on Wild Ice

Getting Started with Nordic Skating
Whether breezing across an alpine lake or soaring down a frozen slough, Nordic skating is a rewarding way to experience both beauty and playfulness outside.
Nordic skating is awesome because it can be more accessible and simple compared to many winter sports. The equipment you need to get started is not too expensive, and it takes less practice to learn the movement patterns. You won’t have to spend years trying to master the basics. You can be gliding around having fun on the ice in no time!
Finding conditions for fun and safe Nordic skating takes some planning and some luck. In Alaska, skating is often an early winter activity, when temperatures drop below freezing so ice can form, but the snow hasn’t yet arrived. Midwinter skating can be fun too – some cities maintain a plowed lake rink area for skating after the snow, and sometimes skaters get lucky after a warm melt spell or a big windstorm that clears the ice of snow. In other areas, the season for skating may be different based on the local climate.
Let’s talk about how to get geared up and out on the ice!
Setting up your Nordic Skates
If you are skating on ice that’s close to town, like a neighborhood pond, you don’t have to use specialty gear–you’ll be fine with just figure skates or hockey skates.
If you choose to adventure to wild spaces or do longer days (or overnights!) on wild ice, getting Nordic skates, boots, and bindings can add more stability and allow for travel on rougher ice. And if you’re lucky enough to get a window of ice conditions on a canoe trail system such as the Swan Lake Canoe Route or Nancy Lakes, Nordic blades allow for easy transitions between walking the trails in your boots and clicking into your skates when you get to the lakes.
When you’re ready to shop for gear, check out this post for tips on finding winter sports gear for less!
Skates
Compared to figure skates or hockey skates, you’ll feel two major differences with Nordic skates. First, the blades are longer. Second, the bindings have a free heel for a better ride on uneven surfaces. If you do an activity like ski mountaineering, you might already be used to a free heel. We’ll get back to bindings in a moment.
Nordic skates are simple: they’re simply a flat metal blade attached to a flat top, forming a “T” shape. The binding attaches to the top of the “T”. When choosing your blades, go with a longer length for more stability and travel on bumpier ice, or opt for shorter if you want more agility for turning, braking, and fancy feet. We like Ermine Skates - designed and built by friends in Anchorage, AK!
Keep in mind that after multiple sessions of skating, your blades will need to be sharpened. How often you need to sharpen them will depend on the terrain and any debris. In other words: if you’re skating over a lot of dirt and such, you’re going to need to sharpen them more! You can learn to sharpen your blades yourself with very few tools and a simple tutorial on YouTube. Or, find a local ski shop to do it for you.
Boots and Bindings

When it comes to boots, you’ve got options. Nordic ski boots (skate, classic, or combi) are the most common choice. They’re light, supportive, and comfortable – and if you’re a Nordic skier you already have them on hand.
We also like alpine touring boots with dynafit toes – these are especially good for very cold conditions and for skating with an overnight pack (the extra ankle support helps a lot). AT boots also do well at keeping feet warmer & dryer, especially after they’ve gotten wet. We use AT boots on days when we’re anticipating temps around or below 0°F, bumpy ice, or overflow (water on top of the ice).
The boots you choose will dictate the binding selection too, since you’ll need bindings that match your boots. Generally, your skates will come pre-drilled with holes so that you can easily attach the ski bindings to the flat top of the skate. These holes make it possible to switch out different bindings & boot systems, if you have multiple ones you use for different conditions.
If you’re new to Nordic skating, don’t get too lost in the weeds with these options – if you have ski boots you like already, use those! All you’ll need is an extra set of bindings that match your boots, and you’re all set.
Alternatively, it’s possible to find skates with strap systems that will allow you to latch any winter boot on to your skate. This option might not be as agile, but it’s easy and a great choice for beginners.
Repair Kit
When the ice is good, you can really get going on skates! It’s not uncommon to cover ~20+ miles in a day, which means that if something breaks with your gear you might be a long way away from help. Being prepared with a repair kit for skate, boot, and binding malfunction has saved us before and likely will again! Consider bringing a well-stocked repair kit with extra screws & nuts that match your binding attachments, extra parts for bindings and boots, a multi-tool, wire, ski strap, and maybe even an extra binding.

Nordic Skating Safety Kit
Before you head out into the wild, get comfortable using your equipment on the ice by visiting local ice rinks. Practicing in a safe, controlled environment will give you more confidence for the wild.
You’ll also need to know how to stay warm and manage temperature in cold conditions, especially with harsh wind chills. If you don’t have experience managing the cold, another way to build your experience is through different activities like winter hiking, where you’ll have less equipment and risks to worry about.
Finally, wild ice carries the risk of falling in, which is a significant safety hazard. Make sure you’re prepared with – and know how to use – the following safety gear:

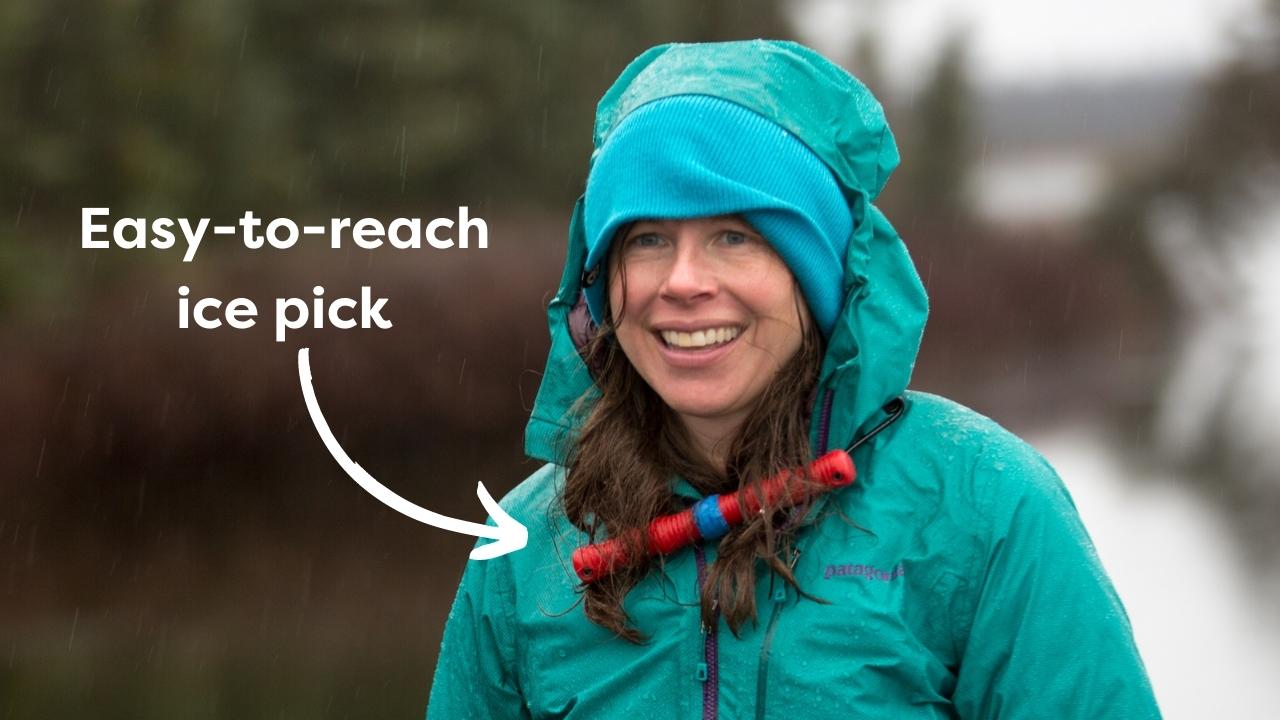
Ice Picks
Like any winter sport, skating comes with risks. The biggest hazard with wild ice skating is falling into the water. This risk is mitigated by accurately assessing ice conditions (more on that below) and having the tools and skills to self-rescue.
Ice picks are the #1 self-rescue tool for Nordic skaters. Typically they’re stored around your neck or in another easy-to-reach location on top of winter layers. It’s a good idea to practice using them – just the exercise of laying on your belly on the ice, grabbing your picks, and using them to pull your body forward on the ice will give you a taste of what kind of angle & proportion you’ll need to employ if you fall in.
It’s crucial that you can self-rescue and climb out of the water if you fall in. If you do fall in, best practice is to turn directly around and try to get out from the same direction you fell in since you know that ice was strong enough to hold you. You’ll also want to propel yourself up onto the ice from as flat as possible; avoid pushing directly down on thin ice as it may cause it to break. Also, if breaking does happen, don’t despair! It’s really normal to break off pieces of thin ice and need to try a few times before you’re on thick-enough ice to support you.
Make sure you carry the picks somewhere you can access them quickly and easily in an emergency, NOT zipped away in your backpack! An ice rescue course is a great option for building this skillset.
Throw Bag & Ice Screws
These additional tools can be used both for self and partner rescue. As with ice picks, they're best used when they're easily accessible and when you've practiced using them.
Another useful self and partner rescue tool is a throw bag. If someone falls into the ice, the rest of the group can stabilize themselves a safe distance away (on thicker ice) and toss the end of the rope to the person who has fallen in.
Ice screws are versatile and can be very helpful safety tools. Group members can use the ice screw as an anchor to tie off an end of the rope onto. Or it can be used to create a pulley system to pull the victim out of the water. Those who have fallen in can also use an ice screw to help pull themselves out, if there is no ice pick available.
Like all safety equipment, these tools only work as well as the people operating them! Remember – During each season, train and prepare with your safety equipment. And most importantly, plan and discuss with your group members how to react if an accident occurs.
Ice Probe
Depending on where you’re going, an ice probe is an important piece of gear to assess whether the ice will be safe for skating. Wild ice can be super variable, and the ice probe allows for on-the-go reading of ice thickness & safety.
An ice probe is a heavy pole with a sharp point, calibrated for assessing ice supportability. It’s a really impressive tool - a heavy pop of it into the ice that pops through indicates ice that’s not thick enough to support a human’s body weight, while a probe that doesn’t pop through indicates safer ice.
Here’s a story that convinced us that everyone should carry an ice probe while Nordic skating:
One gorgeous day on Grewingk Glacier Lake we noticed that the ice had at some point cracked, shifted, and refrozen, with leads of newly formed ice between the larger, thicker sheets. By using our probe, we could tell that the older ice was very thick and stable, but the new leads had refrozen with ice that was less than an inch thick.
As we were exploring the lake (and avoiding these thin sections), we came across a group of skaters who were taking a snack break – and they happened to be sitting on one of these new thin ice sections! They moved along shortly after we noticed their situation, and when we probed the area they’d been sitting on, sure enough, it was less than an inch thick. They got lucky that day!

Helmet
As you’re getting comfortable on ice, a helmet is important protection against falls & head injuries. Any well-fitting helmet would work! A ski/snowboard-specific helmet would also have the benefit of added warmth.
Because wild ice is imperfect and unpredictable, it’s not uncommon to catch a skate in a crack or catch an edge of a skate on a bumpy spot. Even experienced skaters would benefit from wearing a helmet and elbow/knee pads.
Extra Clothes in a Dry Bag
We hope this one is pretty clear! If you get wet, having a warm, dry change of clothes is extremely important to avoid hypothermia. It’s a good idea to bring an extra base layer and warm, puffy layer along, as well as hat, gloves, and socks. Be sure to pack all your clothes in a dry bag so they don’t get wet in case you go for an unplanned swim.
Communication Plan
Make sure you have a way of getting support if an accident happens on the ice. Some areas may have cell service; consider carrying your phone in a waterproof case in order to protect it from submersion.
Many areas of wild ice are outside of cell phone range. In these areas, having a satellite communication device such as Delorme InReach, Spot, or a satellite phone is recommended.
You’ll also want to know who to contact in the event of an emergency. It’s also good practice to have an in-town contact who knows where you are and when you’re expected back.
Optional: Poles & Pads
A pair of poles can be a big help with stability, turning, and building momentum. Skate ski poles will be the most effective, though other poles could also work. If you do a lot of skating with poles, consider sharpening the tips of your poles into a point that aligns with the direction you’ll be pushing. A grinder with a metal bit can make this happen quickly!
Wrist guards and knee & elbow pads are also recommended, as they’ll help to protect your joints in the event of a fall. Falls on ice happen quickly and the extra padding can help reduce injuries.
Finding Safe Wild Ice for Skating
You’ve got your gear ready to go, and you’ve practiced all your skills close to home. You’re ready to go further afield, but how do you know where to go?
Local city groomed ice is a great place to start – they’ll be checking ice thickness and mopping the ice to keep it smooth throughout the winter.
If you’re ready to venture out onto wild ice, ask around in your community through friends, coworkers, or other connections who might be knowledgeable. In general, you’ll be looking for smooth, snow-free ice that’s at least 4 inches thick.
Social media and Nordic Skate Facebook groups like Nordic Skate SE Alaska can be a great source of information, and can help you find adventure partners, too. If you’re in Alaska, SnowIO is a great repository of crowdsourced info.
Wind can be a big issue on lakes, so understanding expected wind conditions can make your day a whole lot better. Fighting a strong headwind on skates does not make for a fun day! On the other hand, if you know the expected wind speed and direction, you can plan a point-to-point trip with the wind at your back.
Near real-time satellite imagery from sources like NASA and SentinelHub are invaluable in getting eyes on what terrain is like before you go and to find new spots. To dive deeper into learning weather trend data, satellite imagery, and trip planning, you can find all this and more in my husband Luc Mehl’s online course, Start and End at Home.
Keep in mind that ice conditions change quickly! Once we skated on gorgeous, solid ice at the 4pm sunset the day after Christmas (the ice had a sheen of water on top so the sunset reflected in a way that made it feel like we were skating on the sky). As we were leaving, we felt a warm breeze blow in… and when we went back the next day the ice had thinned to less than an inch in most places. Another example of when the ice probe was critical!
Often, searching for wild ice ends up being an adventure in itself. We’ve taken our skates on many hikes into the mountains, hoping we’d find gorgeous frozen lakes and instead finding either wide open water or a snowy surface. Luckily, skates aren’t heavy and the adventures are always worth it in other ways. And when those ephemeral wild ice conditions work out, we feel extra fortunate and grateful!

Skating Strong
Want to boost your strength as a confident and stable skater? The keys to strong skating are stable knees, hips, and core. Balance is crucial, too, which means building those tiny stabilizer muscles. Exercises that incorporate lateral movement and/or single-leg stability help strengthen the body for the demands of wild ice.
We’d love to help you take the guesswork out of strength building, so you can focus on doing more of what you love. Our Ski Babes online training program is designed especially for winter sports, getting you ready for those slippery, sliding movements on snow and ice. We’ll not only help build your physical strength, we’ll also give you the tools you need for a strong mindset and nutrition for your winter season.
Ski Babes is in progress now, learn more about the program and join our community for our next round of workouts here!